GauGAN: Changing Sketches into Photorealistic Masterpieces 3月的时候,英伟达发布了一个视频挺火的: 你只要粗略勾勒简单的线条,AI就能生成逼真的写实图片。
GauGAN: Changing Sketches into Photorealistic Masterpieces 3月的时候,英伟达发布了一个视频挺火的: 你只要粗略勾勒简单的线条,AI就能生成逼真的写实图片。
GitHub地址
那它是怎么实现的呢? 这个项目用的是GAN算法。
GAN模型的任务:
学习任务 : 输入semantic segmentation mask, 合成 photorealistic images。
Semantic Image 是啥叻? 直观上理解,如下图:
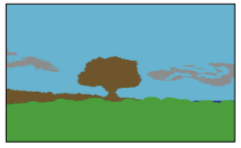
Image segmentation呢?1
2Image segmentation is a computer vision task in which we label specific regions of an image according to what's being shown.
the goal of semantic image segmentation is to label each pixel of an image with a corresponding class of what is being represented.
如下图里的每个像素都被分类归属到不同的class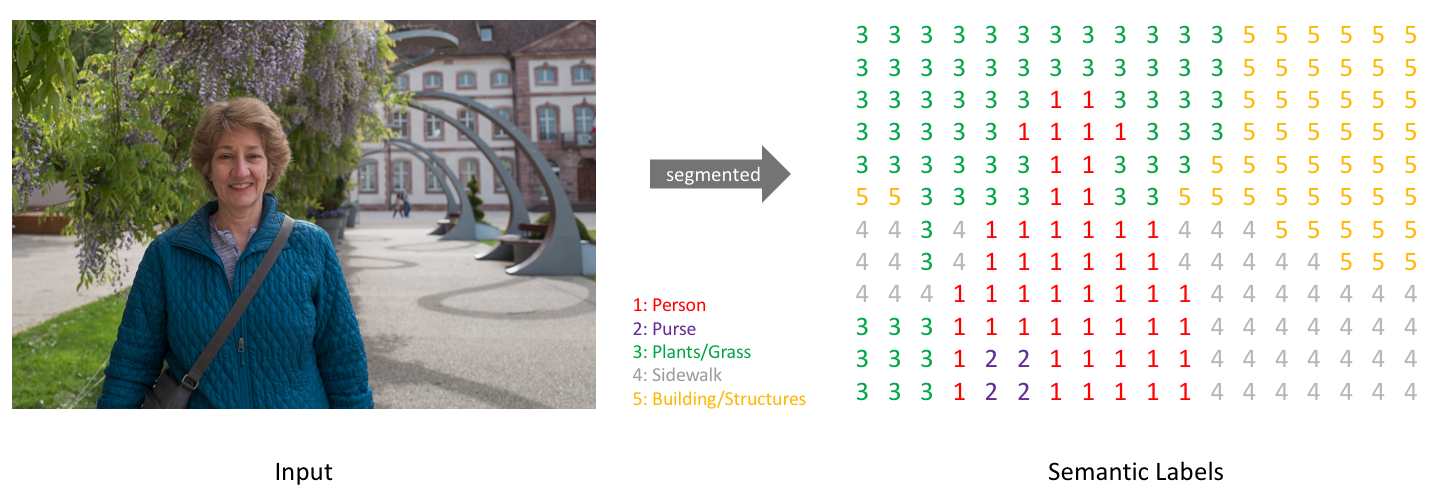
图片来源
SPADE: SPatially-Adaptive (DE)normalization
Normalizaing training sets
首先,要了解一下Normalization的处理跟好处。
处理: 以逻辑回归为例, 它的输入特征$X$,权重$W$, map函数如下
$$f(x) = \sum_{i=1}^{n}x_i*w_i$$
先求输入的特征$x$的期望
$$\mu=\frac{1}{n}\sum_{i=1}^{n}x_i$$再求$x$的方差
$$\sigma^2 = \frac{1}{n} \sum_{i=1}^{n}(x_i - \mu)^2$$
- 再对输入特征做Normalization:
$$\frac{x-u}{\sigma^2}$$
好处是,经过处理的input特征值分布更集中均匀, 如下图的第三个坐标系,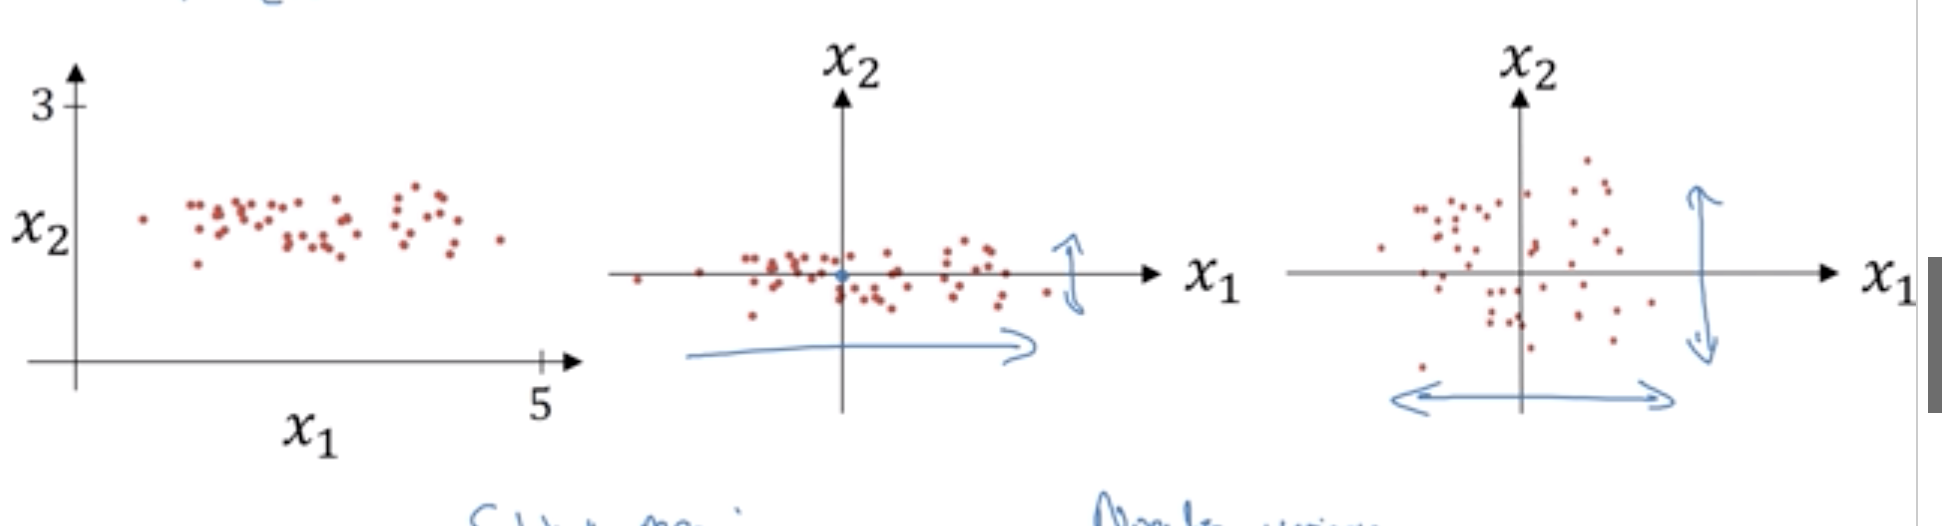
对于损失函数,
$$J(w, x) = \frac{1}{m}\sum_{i=1}^{m}L(\hat{y}, y)$$
用梯度下降训练W,B的时候,Normalization后,形状更圆一些,更容易优化。无论初始从哪个位置开始,你都可以用较大的步长,比较容易找到适合的w,b的值,使得J(w,b)的值最小。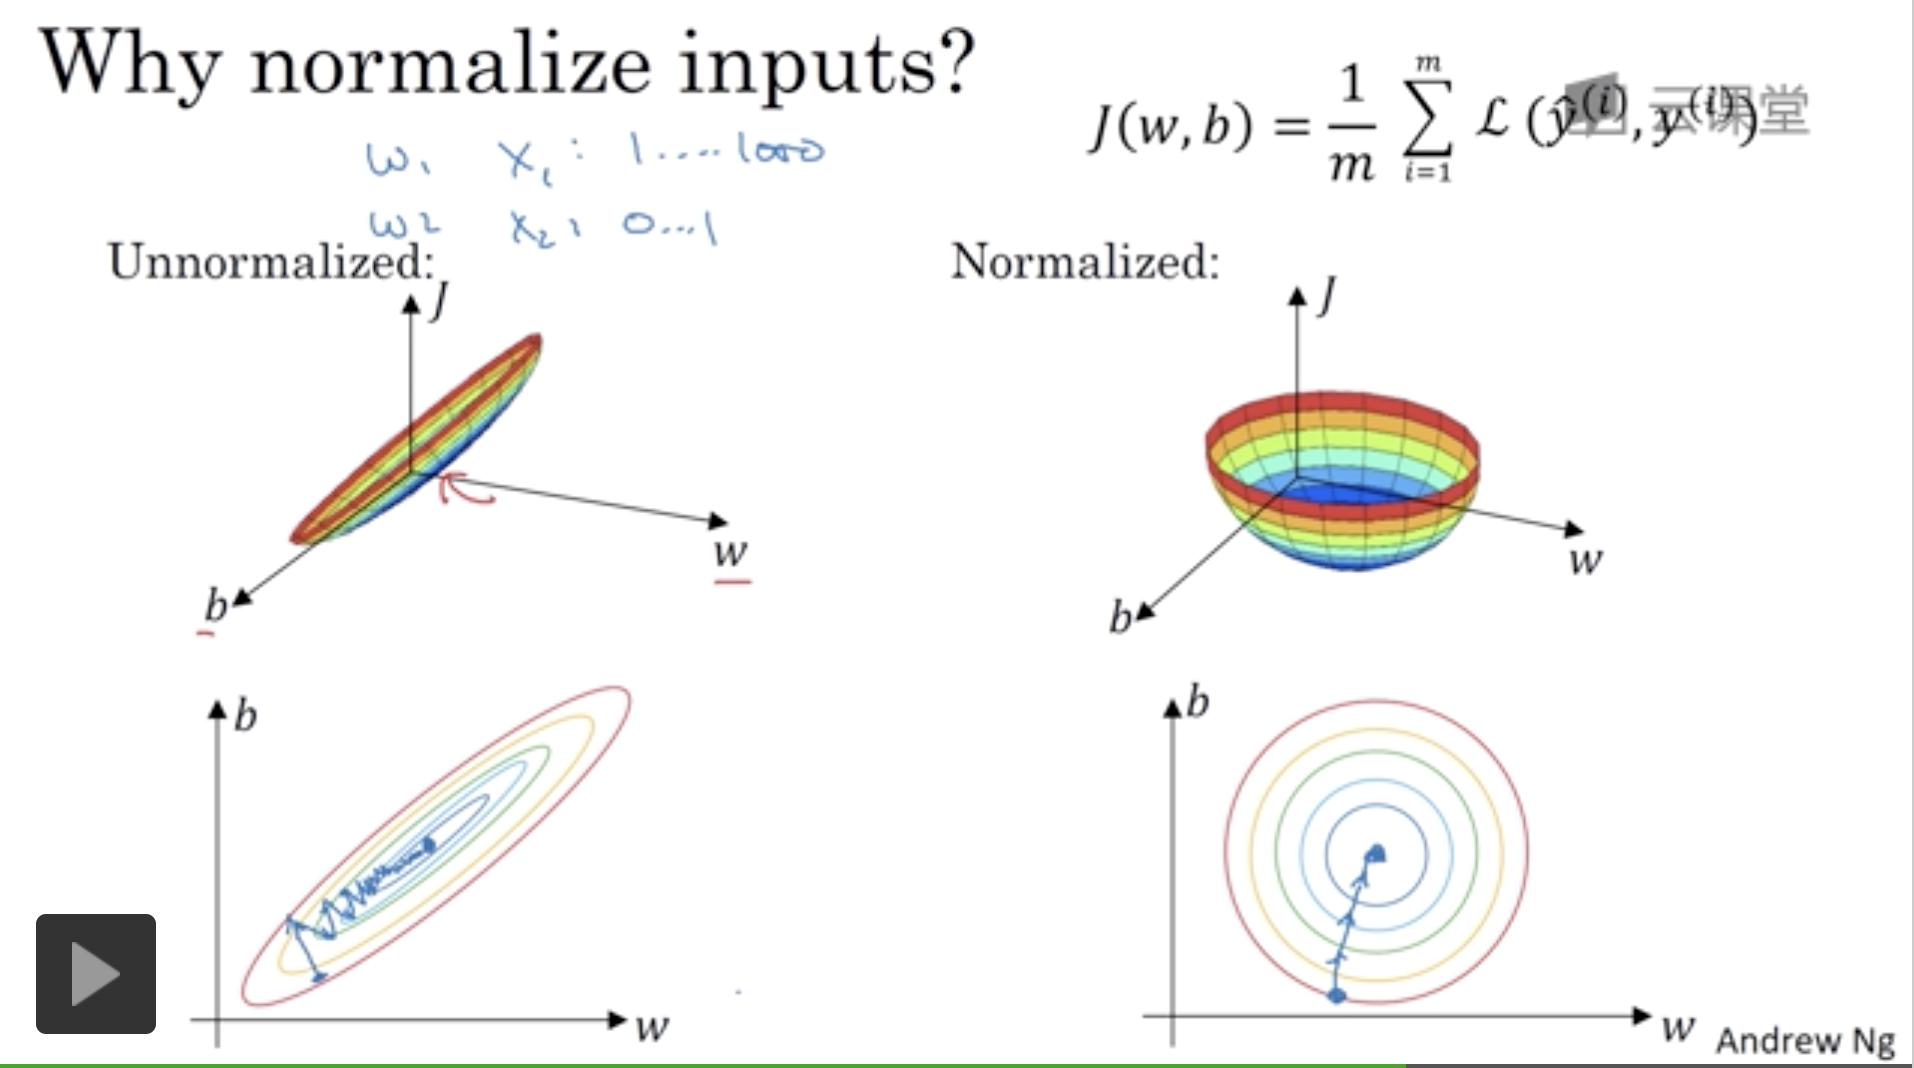
Batch Normalization
改善深层神经网络:超参数调试、正则化以及优化 - 网易云课堂
Batch Norm不止normailize input feature;也可将normalization process应用在神经网络中的hidden layer上。
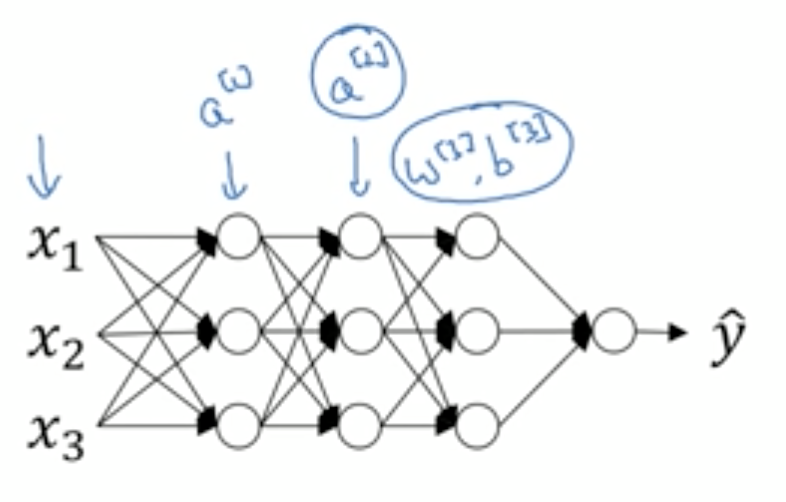
比如对隐藏层$a^{[2]}$的输出进行正则化处理,加速下一层的参数$w^{[3]}$,$b^{[3]}$的训练速度。比如$a^{[2]}$层的神经单元分别是 $z^{(1)}, z^{(2)}…z^{(m)}$
对它的处理是
- 求期望:
$$\mu = \frac{1}{m}\sum_{i=1}^{m}z_i$$ - 求方差:
$$\sigma^2 = \frac{1}{m}\sum_{i=1}^{m}(z_i - u)^2$$ - norimal
$$z_i = \frac{z_i-u}{\sqrt{\sigma^2 + \varepsilon}}$$
加上$\varepsilon$是防止$\sigma^2$为0 - 加上 $\gamma$ 跟 $\beta$;
scale and shift the normalized value
$$\hat{z} = \gamma z_i + \beta$$
$\gamma$ 跟 $\beta$ 也是参数,跟w, b一样在训练过程中迭代学习。 神经网络中他们也常在激活层之前进行Batch Normalization处理。
(Spatially-Adaptive normalization)SPADE
这篇论文提出自己的normalization思路,$h^i$是 i-th层的激活函数输出。
正则化处理:
$$\gamma_{c, y, x}^i (m)\frac{h_{n, c, y, x}^i - \mu_c^i}{\sigma_c^i} + \beta_{c, y, x}^{i}(m)$$
c: $c \epsilon C^i, C^i$是i-th层的channel个数
x: $x \epsilon W^i, W^i$是i-th层的宽
y: $y \epsilon H^i$, 高
m: segmentation mask m
$\gamma_{c, y, x}^i$跟$\beta_{c, y, x}^{i}$ 是函数,用卷积网络实现
结构图:
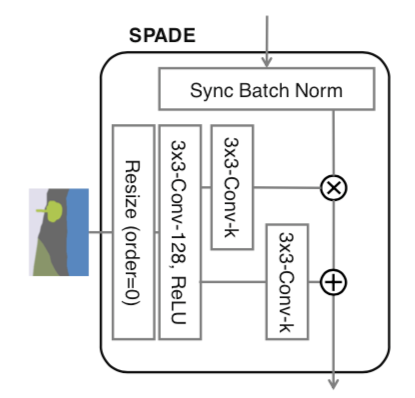
3x3-Conv-k是 3x3卷积层,有k个卷积filter, filter size 3x3ReLU激活函数- 这里的
Resize用的是nearest-neighbor downsampling,不细说了。
它的处理流程是这样,对sematic image 进行resize、卷积、ReLU激活处理, 即$\gamma_{c, y, x}^i(m)$跟$\beta_{c, y, x}^{i}(m)$, 乘、加上Batch Normalization的输出数据$\frac{h_{n, c, y, x}^i - \mu_c^i}{\sigma_c^i}$ ,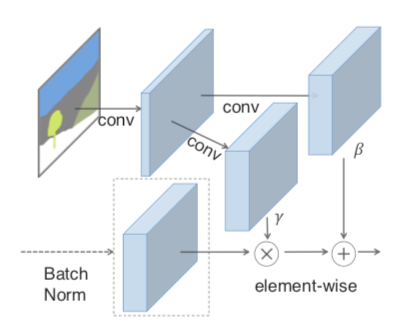
比起传统Batch Normal,SPADE的$\gamma_{c, y, x}^i(m)$跟$\beta_{c, y, x}^{i}(m)$是对sematic image做卷积操作,它在normalization过程中保存更多semantic的信息。论文中也认为这是SPADE效果更好的原因。
相关代码:
normalization.py
1 | // 用传统的normalization method正则化激活函数输出 |
1 | // 构建gamma,beta函数, 卷积层实现 |
1 | def forward(self, x, segmap): |
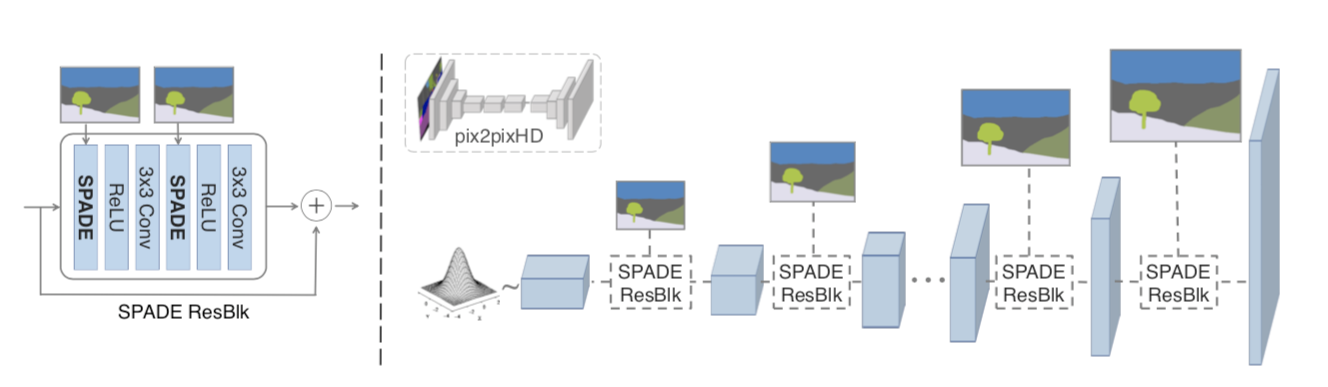
模型架构 GANs
GANs由两部分组成:
首先
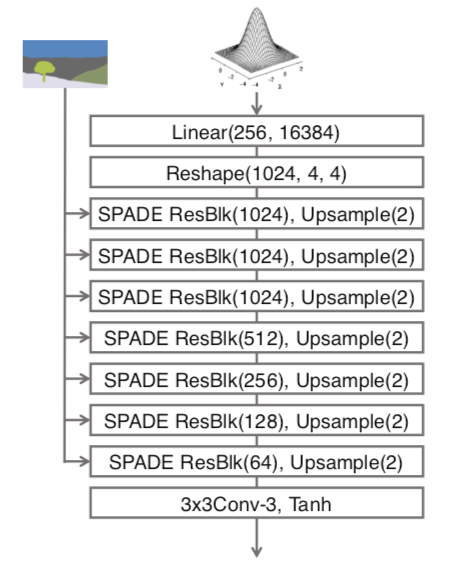
这幅图里好多SPADE ResBlk啊,啥是SPADE ResBlk? 下面是它的结构图:
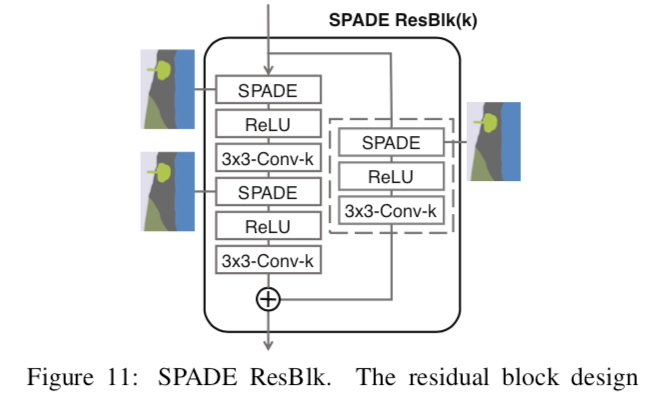
3x3-Conv-k是 3x3卷积层,有k个卷积filter, filter size 3x3ReLU激活函数- SPADE激活见上文分析
那ResBlk呢?
这要从大名鼎鼎的残差网络说起 Residual block (强烈推荐Andrew Ng公开课; 弄明白几个点: 1. Residual Block要解决什么问题; 2. 它的设计; 3. 为啥有效。 再回来看SPADE ResBlk)
1
2
3
4
5
6
7
8
9
10
11
12
13
14
15
16
17
18
19
20
21
22
23
24
25def __init__(self, fin, fout, opt):
super().__init__()
# Attributes
self.learned_shortcut = (fin != fout)
fmiddle = min(fin, fout)
# create conv layers
self.conv_0 = nn.Conv2d(fin, fmiddle, kernel_size=3, padding=1)
self.conv_1 = nn.Conv2d(fmiddle, fout, kernel_size=3, padding=1)
if self.learned_shortcut:
self.conv_s = nn.Conv2d(fin, fout, kernel_size=1, bias=False)
# apply spectral norm if specified
if 'spectral' in opt.norm_G:
self.conv_0 = spectral_norm(self.conv_0)
self.conv_1 = spectral_norm(self.conv_1)
if self.learned_shortcut:
self.conv_s = spectral_norm(self.conv_s)
# ✨✨✨ define normalization layers
spade_config_str = opt.norm_G.replace('spectral', '')
self.norm_0 = SPADE(spade_config_str, fin, opt.semantic_nc)
self.norm_1 = SPADE(spade_config_str, fmiddle, opt.semantic_nc)
if self.learned_shortcut:
self.norm_s = SPADE(spade_config_str, fin, opt.semantic_nc)
Discriminator
discriminator架构图。 (segmentation image, image)作为输入, 任务是识别image是不是假的。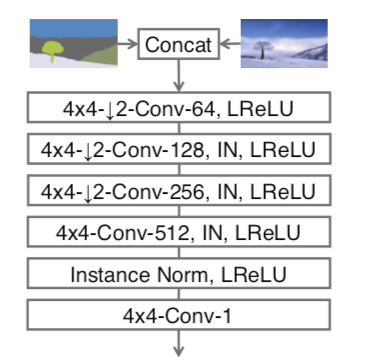
image encoder将图片encode生成均值向量跟方差向量, 计算出noise input输入给generator, segmentation mask也会通过SPADE ResBlks输入给generator。 generator生成image跟segmentation image contact后,再输入给discriminator, discriminator来辨别真伪。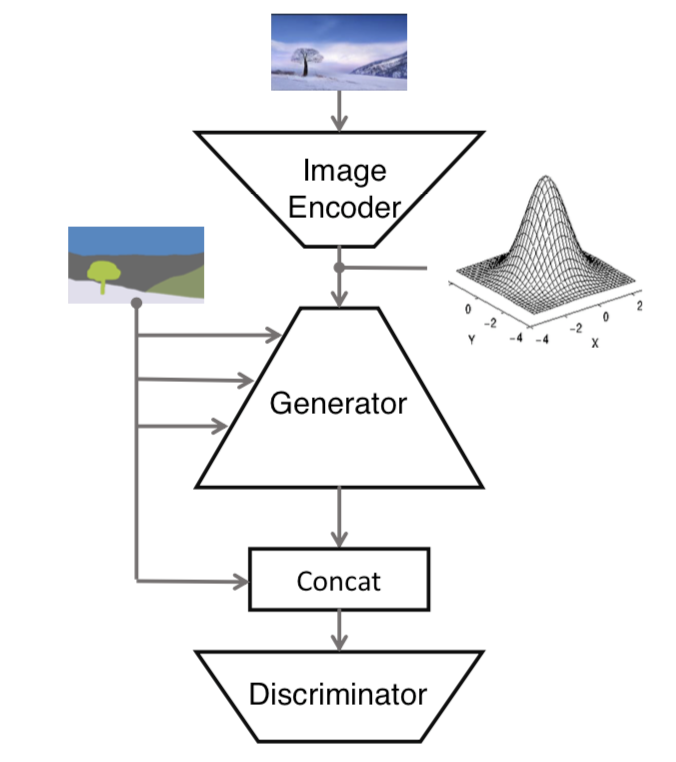
Training Data
成对的segmentation masks跟真实图片。 (segmentation mask, real image)
Test
1.安装:
1 | git clone https://github.com/NVlabs/SPADE.git |
2.这个项目依赖PyTorch 1.0跟python3.0+. 还依赖Synchronized-BatchNorm-PyTorch仓库。
1 | // SPADE目录下 |
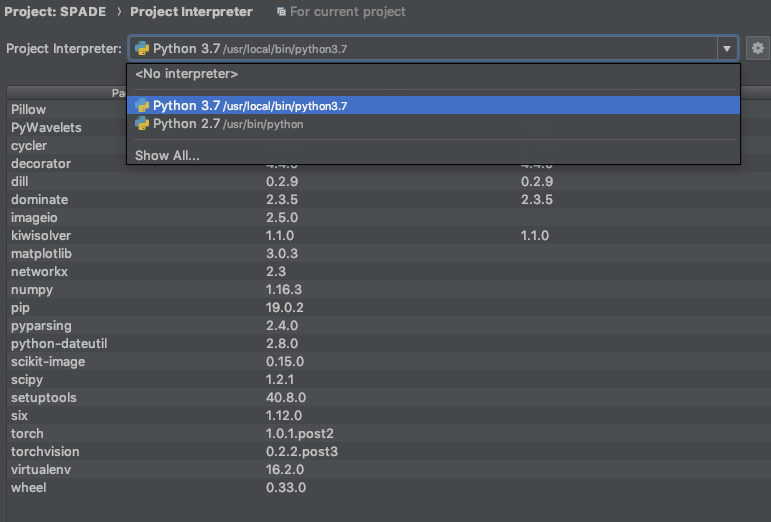
3.用PyCharm打开这个项目, Preference -> Project Interpreter -> Project -> Project Interpreter; 选python3.+的解释器, PyCharm会提示安装依赖的package。依赖包安装好后,如下图:
4.下载提前训练好的模型
checkpoints.tar.gz - Google 云端硬盘
1 | cd checkpoints |
5.编辑Configuration, 运行test.py脚本。1
python test.py --name [type]_pretrained --dataset_mode [dataset] --dataroot [path_to_dataset]
参数:
[type]_pretrained先渲染好的模型,coco_pretrained, ade20k_pretrained, cityscapes_pretrained中任选一个。[dataset]填coco, ade20k, 或者cityscapes[path_to_dataset]数据,比如./datasets/coco_stuff
比如,我的参数:1
2
3
4
5
6
7
8--name
coco_pretrained
--dataset_mode
coco
--dataroot
./datasets/coco_stuff
--gpu_ids
-1
输出的路径: ./results/[type]_pretrained/ 我的是./results/coco_pretrained/
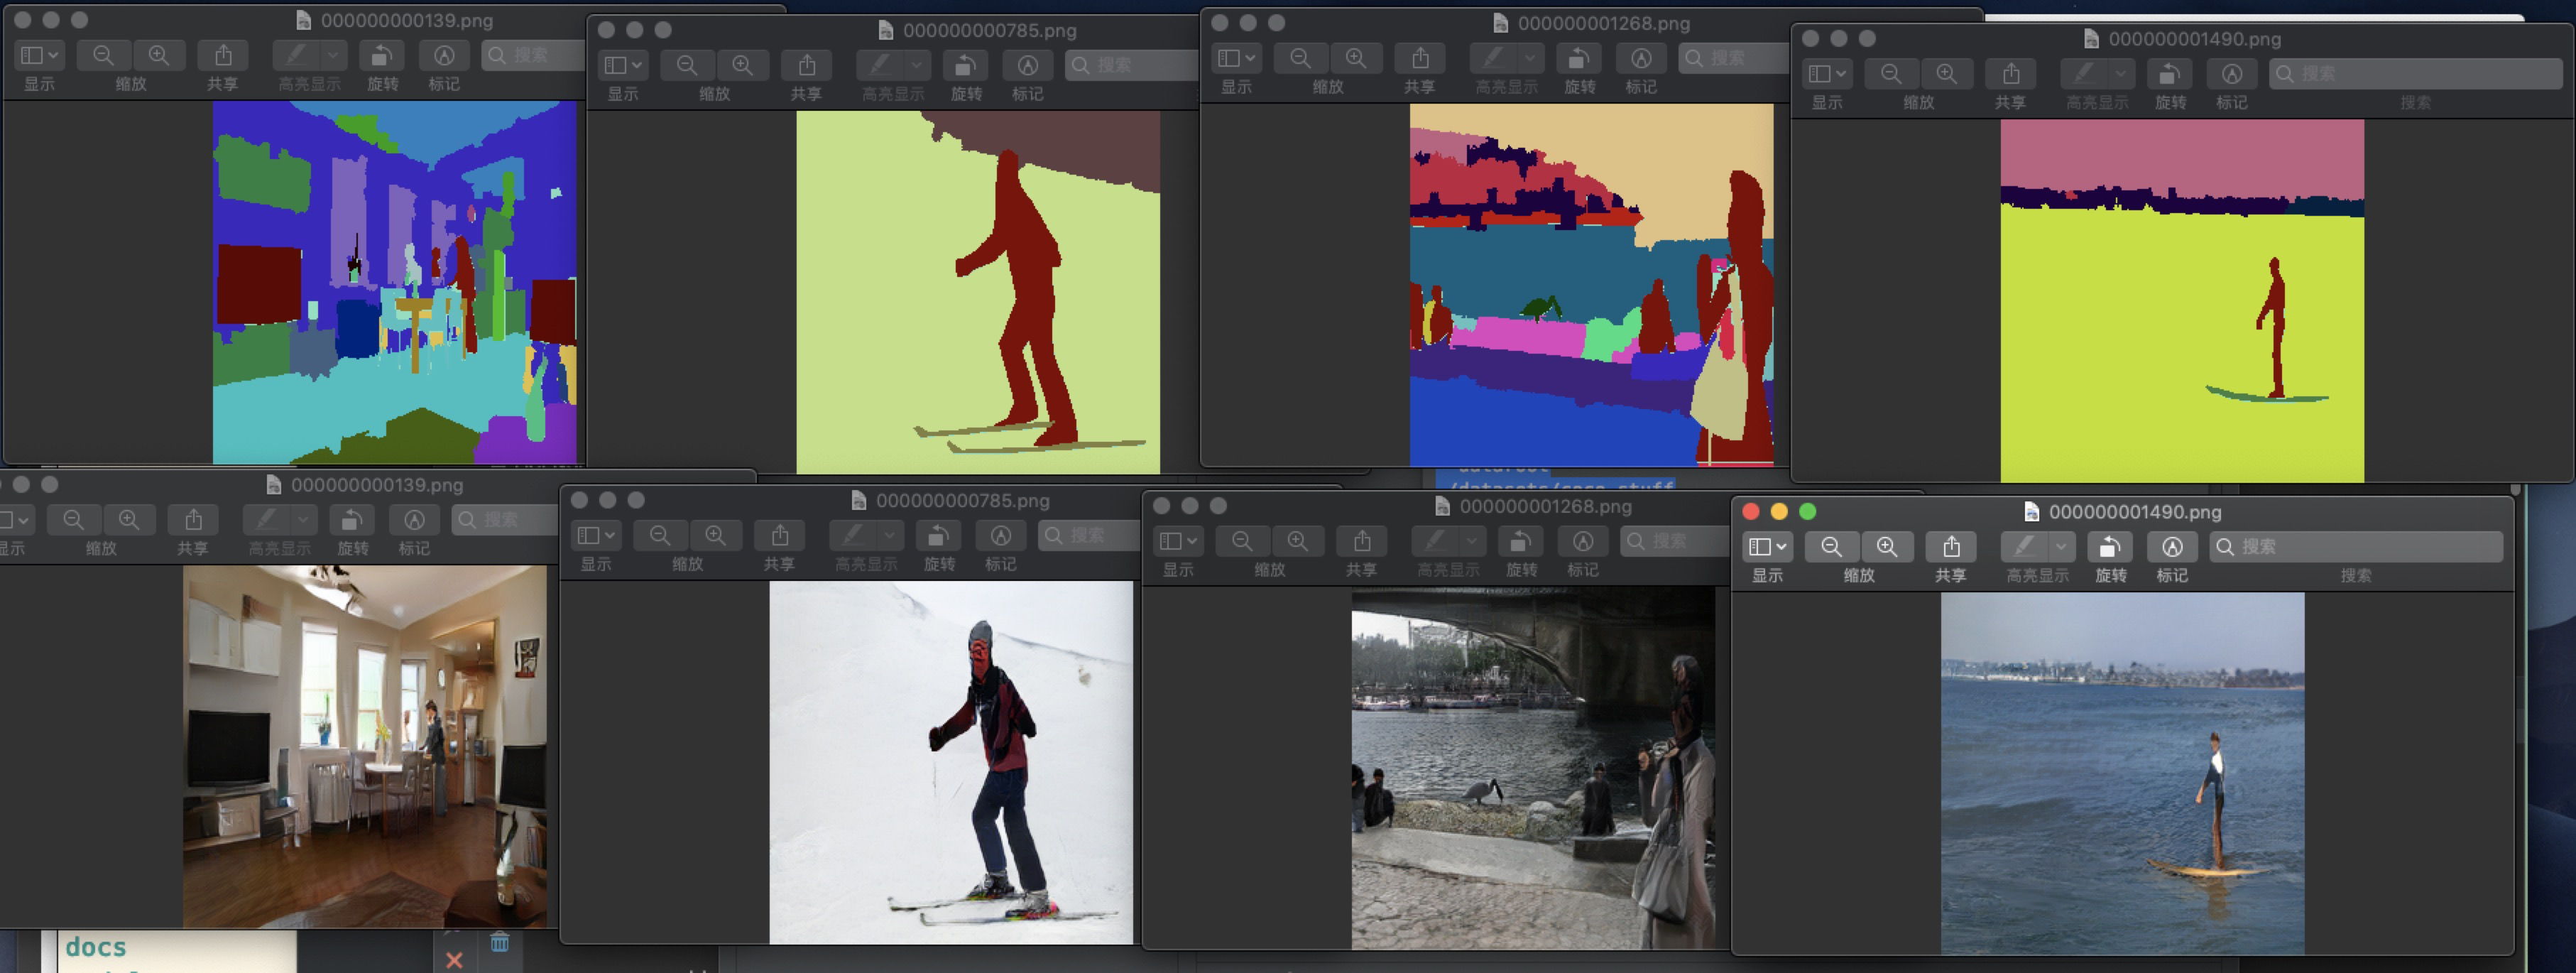
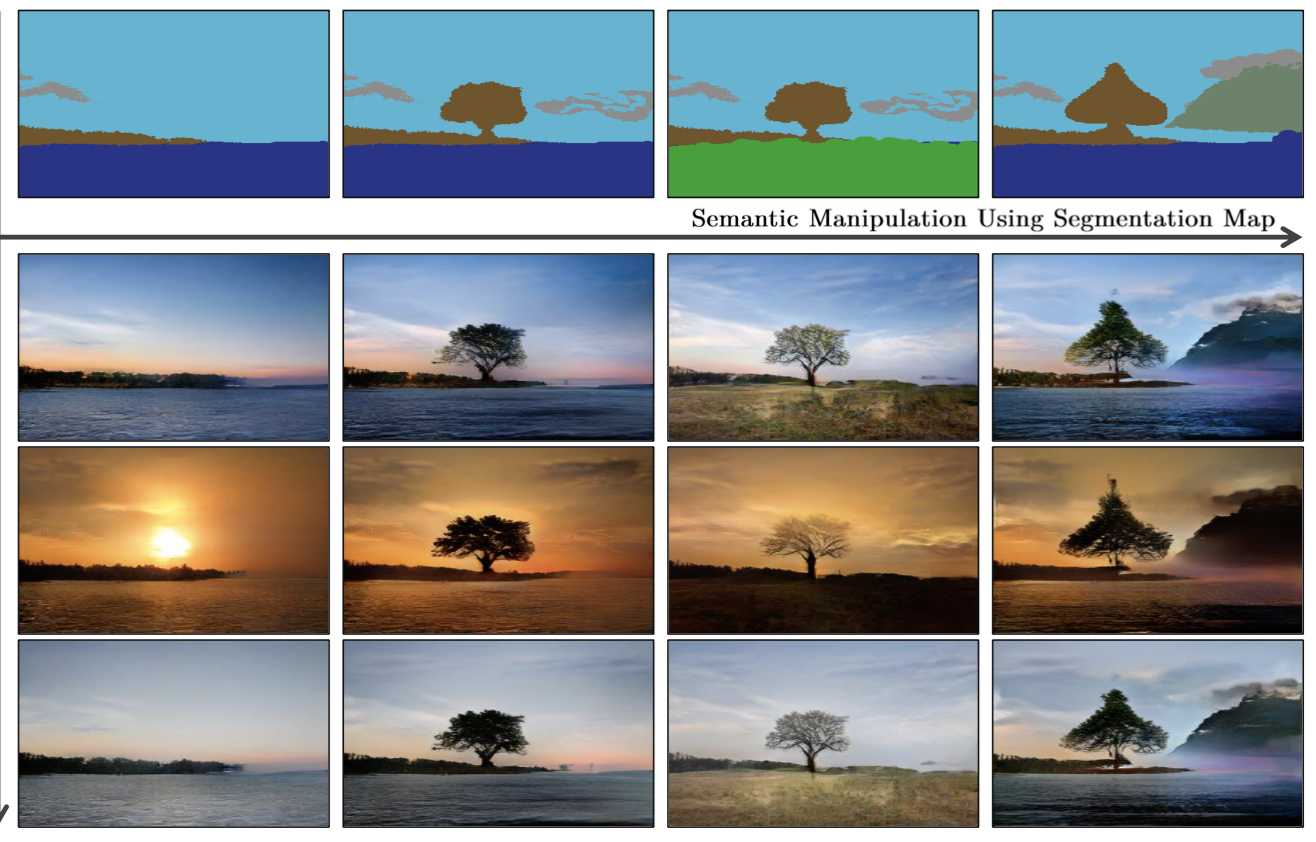
这几张图片真是看的我有点失望,再看看下图论文的图片。 果然论文的图片都是精挑细选, 套路满满。
scan qr code and share this article